Push Notifications for iOS and Android with a PHP back end
(Note: For Android, I only cover the PHP code used to send the notifications, while for iOS the guide is a lot more thorough.)
Foreword
At Free-eBooks.net, many of our readers wanted an easy way to get notified through our mobile apps about the newest titles we receive, so after exploring our options a bit, we set about implementing push notifications. What’s more, they’re also a great way to grow retention — don’t let people forget about your app.
Having recently revamped our API so that it serves both Free-eBooks.net’s iOS (in English & Spanish) and Android apps — it was relatively easy to add this across all our apps.
In this guide, I’ll replicate a part of our setup and offer advice and best practices. If you notice anything that can be improved, feedback is most welcomed.
Tools & planning
As is usually the case, there’s no need to reinvent the wheel, and a bit of research yielded the following three tools that can take us most of the way:
- PermissionScope beautiful, simple permission requests for iOS, written in Swift but also compatible with Objective-C.
- AFNetworking powerful but easy-to-use networking library for iOS.
- NotificationPusher straightforward push notifications in PHP with support for APN (iOS) and GCM (Android).
They’re all incredibly easy to install and really well documented.
But before we dive into programming, we need to make some decisions. For one, when would we prompt the user for the push notifications? On Android, that’s “taken care of” right when the user installs the app or an update for all versions of the OS prior to 6.0 Marshmallow. Apps on iOS on the other hand start with very few permissions initially and need to ask for each new thing they want to do.
Seeing things from a user’s standpoint as well as learning from others’ experiences so far tells us that we should never directly show the “Allow push notifications?” system dialog. With no context and “warm-up”, the user will be wary of the pop-up and most likely cancel or decline just to get rid of it. As is often the case, we need to first tell the user what’s in it for them — how does it benefit them if they let you directly message their devices?
PermissionScope covers most of the above with an easy-to-use pop-up dialog that takes care of a few things for us. To start, it allows us to explain what the user is being asked for and what the benefits are before they are presented with the system dialog. It also provides an easy way for the user to take action. Finally, it’s really simple to setup so we can easily process whatever action the user took.
Users are likely most interested in your app when they first open it — but that doesn’t mean you should just present the dialog right after the app starts. You still need to make sure the initial on-boarding experience is as painless as possible, especially if your app requires signing up or login. You can’t grow retention if you’re losing first-time users.
In our particular case, we wanted to show it when the user is engaged & showing interest in the app. So, after they’ve browsed for a bit, found a book they like and selected to learn more about it or potentially download it, we ask if they’d like to get new eBooks delivered every week. The eBooks they’re notified about are our weekly “Editor’s Choice” eBooks so only our best new reads are delivered. That’s another thing to keep in mind — make sure the content is interesting & relevant to keep your users happy, or all your push notifications might start backfiring.
You should look for similar areas in your app and find the perfect spot that would provide effectiveness without being too annoying or too soon. For example, if you have a sports app where people can browse for teams, most likely the first team they look at is their favorite one, so asking something along the lines of “Want to follow Real Madrid? Get news delivered to your device instantly!” has a good chance of being effective. A weather app could ask for push notifications right after a user has added their first city. You get the idea.
Sometimes, users will decline your request, but may continue using your app. In those cases we run a periodic check and ask again in a while, just in case they’ve changed their mind and found that the app does provide them with the value they’re looking for. It’s usually a few weeks between prompts as we don’t want to turn users away that might find it too annoying otherwise. Reminding or prompting more often (say at each app launch or activation) could yield better results in terms of the percentage of people allowing notifications, but unless you’re as irreplaceable as Facebook and their Messenger app, it’s probably safer to only do it once in a while, as it might actually hurt your user retention and potentially your ratings too.
Getting our hands dirty
Now that we have a general idea of what we want to accomplish, why and how, we can start programming and putting the pieces together.
Create a new file in your iOS project’s directory called Podfile. We will install PermissionScope and AFNetworking via Cocoapods. Visit the website if you need installation instructions for Cocoapods. The Podfile should contain the following:
source 'https://github.com/CocoaPods/Specs.git'

use_frameworks!

platform :ios, '9.0'

target 'PushNotifier' do # replace with your own target name
  pod 'AFNetworking', '~> 2.0'
  pod 'PermissionScope'
end
Then, in the terminal, navigate to your project dir and execute the following:
$ pod install
This will grab the latest versions of the libraries and make them available in your project.
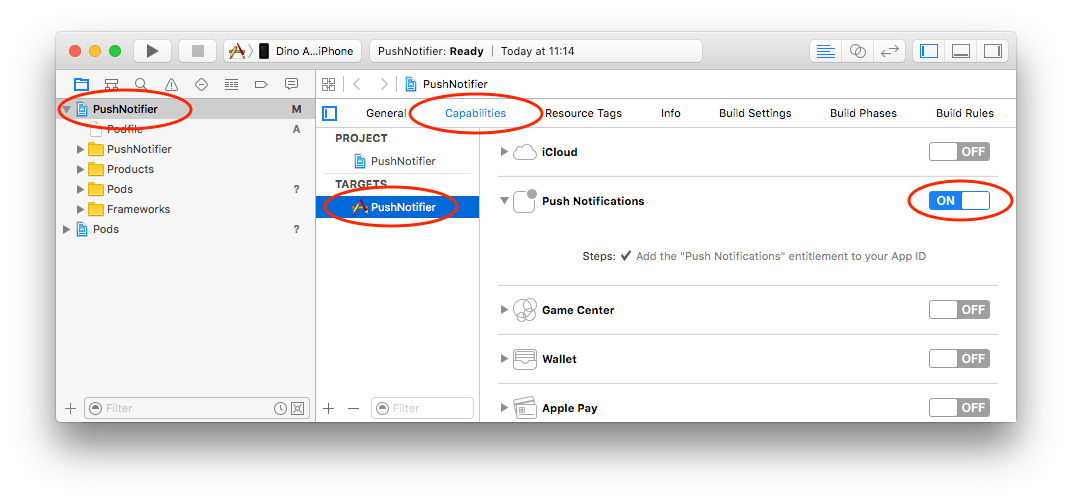
Once you’ve closed the current session and reopened via the .xcworkspace file, enable Push Notifications in the target’s Capabilities tab as shown below.
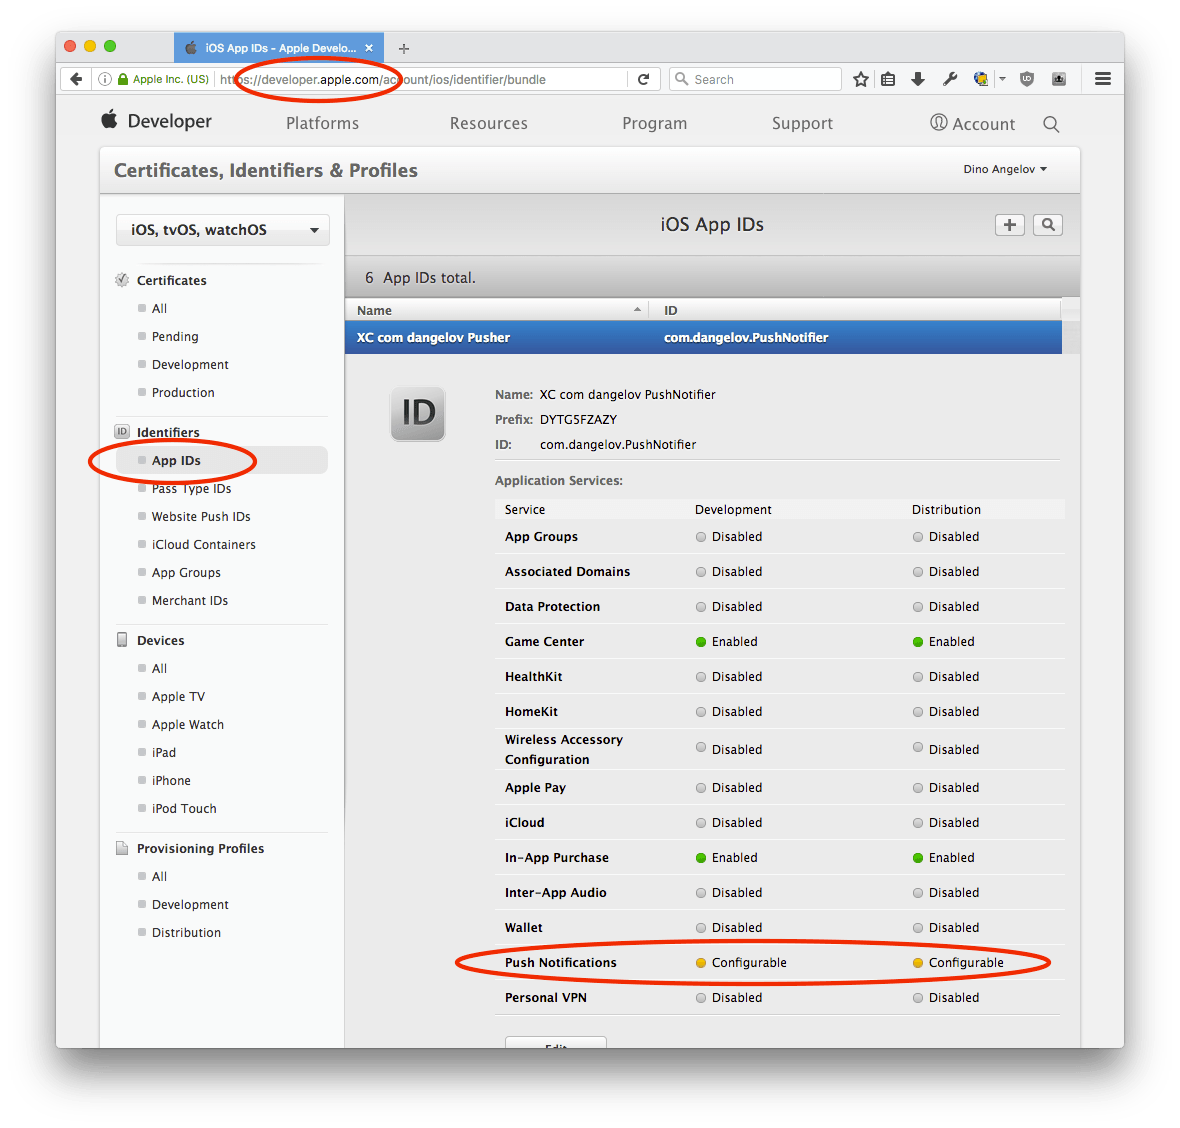
Open https://developer.apple.com and login to your account to verify that everything went well. Make sure your app ID is in the list and that the capabilities are correctly enabled. Since you don’t have certificates created yet, it will say “Configurable” instead of “Enabled”. This will change soon. You can also edit an existing identifier to add the capability manually, or create a new App ID if you need to do so.
We can leave that as-is for now and move on to some programming.
With the help of the PermissionScope library we installed via Cocoapods earlier, the following Objective-C snippet is a simple way to ask for the Push Notifications permission. Just add it anywhere you’d like to activate the permissions pop-up — for example soon after a new view was loaded.
/* Import PermissionScope.
   Place this at the top of your view controller header. */
@import PermissionScope;

/* Add this code inside the function you want
   to call to show the permissions screen */
PermissionScope* pscope = [PermissionScope new];
[pscope addPermission:[[NotificationsPermission alloc] initWithNotificationCategories:nil] message:@"We deliver the most relevant news once a week."];
pscope.headerLabel.text = @"Like staying informed?";
pscope.bodyLabel.text = @"Allow notifications to get our news once a week.";
[pscope show:^(BOOL finished, NSArray<PermissionResult *> * _Nonnull results) {
    for (PermissionResult *result in results) {
      if ((result.type == PermissionTypeNotifications) && (result.status == PermissionStatusAuthorized)) {
          UIUserNotificationType userNotificationTypes = (UIUserNotificationTypeAlert | UIUserNotificationTypeBadge |  UIUserNotificationTypeSound);
          UIUserNotificationSettings *settings = [UIUserNotificationSettings settingsForTypes:userNotificationTypes categories:nil];

          [[UIApplication sharedApplication] registerUserNotificationSettings:settings];
          [[UIApplication sharedApplication] registerForRemoteNotifications];
      }
  }
} cancelled:^(NSArray<PermissionResult *> * _Nonnull results) {
    NSLog(@"%@", results);
}];
The above code shows the PermissionScope dialog. Callbacks are provided if you’d like to take direct action based on the user’s choice. Otherwise, you can just leave them as-is. If the user allows Push Notifications the application delegate will be called with a unique device token after a short while. That device token needs to be stored on the server, as it will be used later to uniquely identify this device when you want to send push notifications. The following code should go in your AppDelegate.m file.
/* Import AFNetworking.
   Place this at the top of your AppDelegate.h file. */
#import <AFNetworking/AFNetworking.h>

/* Place this somewhere in your AppDelegate.m file. */
- (void)application:(UIApplication *)application didRegisterForRemoteNotificationsWithDeviceToken:(nonnull NSData *)deviceToken {
    // Log it to console so we can verify manually later
    NSLog(@"Device token (base64): %@", [deviceToken base64EncodedStringWithOptions:0]);
    // Register this device for push notifications through our API.
    AFHTTPRequestOperationManager *manager = [AFHTTPRequestOperationManager manager];
    manager.requestSerializer = [AFJSONRequestSerializer serializer];
    manager.responseSerializer = [AFJSONResponseSerializer serializer];

    /* We store the device token in base64-encoded form for consistency
       among the iOS and Android apps in our MySQL database. */
    NSDictionary *params = [NSDictionary dictionaryWithObjects:[NSArray arrayWithObjects:@"ios", [deviceToken base64EncodedStringWithOptions:0], nil] forKeys:[NSArray arrayWithObjects:@"type", @"token", nil]];

    // Don't forget to change to your real POST URL. Make sure your server supports HTTPS.
    [manager POST:@"https://www.example.com/register-device" parameters:params success:^(AFHTTPRequestOperation *operation, id responseObject) {
        if ([(NSNumber *)responseObject[@"success"] intValue] == 1) {
            // Success!
        } else {
            // Our API says something went wrong.
        }
    } failure:^(AFHTTPRequestOperation *operation, NSError *error) {
        // There was an HTTP error (timeout, 404, 500 etc).
    }];
}
The few lines of code above take care of the majority of what needs to be done on the client side. That means we can now jump on working on the backend for a bit, which needs to be prepared to receive device tokens. Let’s start with the database table that would hold the data. Here’s how that might look, with a few indexes set in order to keep things speedy. Execute the following SQL in your MySQL client of choice. If you’re on OS X, I recommend the excellent Sequel Pro. (MySQL only, sorry Postgres folks)
CREATE TABLE `push_notification_devices` (
  `type` enum('ios','android') NOT NULL DEFAULT 'ios',
  `token` varchar(255) NOT NULL DEFAULT '',
  `user_id` int(15) NOT NULL DEFAULT '0', /* You can omit this if your app doesn't have or use user accounts and you want to send generic notifications */
  `active` tinyint(1) NOT NULL DEFAULT '1',
  `updated_at` int(15) NOT NULL DEFAULT '0',
  UNIQUE KEY `token` (`token`), /* Ensures there are no duplicate device tokens */
  KEY `type` (`type`),
  KEY `updated_at` (`updated_at`),
  KEY `user_id` (`user_id`)
) ENGINE=InnoDB DEFAULT CHARSET=utf8;
This table will hold the records inserted by the following PHP code. The code below will receieve the device token and other info from our app, and then insert it in the database table.
Note: The following code will require you to modify it and implement some additional safeguards. Take it for what it is: a helpful pointer in the right direction, not a final solution. Though you could most likely just copy-paste, I strongly encourage you to take the time to understand what’s going on and the best way to fit it into your project.
<?php

$db_host = 'localhost';
$db_name = 'dbname';
$db_user = 'dbuser';
$db_pass = 'dbpass';

$allowed_device_types = [
                         'ios',
                         'android',
                        ];

try {
    $req = json_decode(file_get_contents('php://input'));
    if ($req === null) {
        throw new Exception('Invalid data.');
    }

    if (in_array($req->type, $allowed_device_types) === false) {
        throw new Exception('Invalid device type.');
    }

    if ((strlen(trim($req->token)) === 0)
        || (strlen(trim($req->token)) > 250)
    ) {
        throw new Exception('Invalid device token.');
    }

    $pdo = new \PDO(
        sprintf('mysql:host=%s;dbname=%s;charset=utf8mb4', $db_host, $db_name),
        $db_user,
        $db_pass,
        [
         \PDO::ATTR_ERRMODE    => \PDO::ERRMODE_EXCEPTION,
         \PDO::ATTR_PERSISTENT => false,
        ]
    );

    $statement = $pdo->prepare(
        'INSERT INTO
        `push_notification_devices`
        (`type`, `token`, `user_id`, `updated_at`)
        VALUES
        (:type, :token, :user_id, :updated_at)
        ON DUPLICATE KEY
        UPDATE `updated_at`=:updated_at'
    );
    // Note: $user_id must be provided by your own API.
    $user_id = 0;
    $statement->execute(
        [
         ':type'       => $req->type,
         ':token'      => $req->token,
         ':user_id'    => $user_id,
         ':updated_at' => time(),
        ]
    );

    echo json_encode(
        ['success' => true]
    );
} catch(\PDOException $e) {
    echo json_encode(
        [
         'success'       => false,
         'error_message' => $e->getMessage(),
        ]
    );
} catch (Exception $e) {
    echo json_encode(
        [
         'success'       => false,
         'error_message' => $e->getMessage(),
        ]
    );
}//end try
Save this somewhere on your server and update your Objective-C code to point to the correct location. After running it from a test device or two (but not the simulator), you might end up with something like this in your MySQL table.
| type | token | user_id | active | updated_at |
|---|---|---|---|---|
| ios | IZZsPS/QOL+… | 1234567 | 1 | 1463230274 |
| android | iVDZFFqa72Q… | 7654321 | 1 | 1462920828 |
We’re almost there. All we have to do now is connect to Apple’s or Google’s servers and send a message. To do that, we need to setup a few more things.
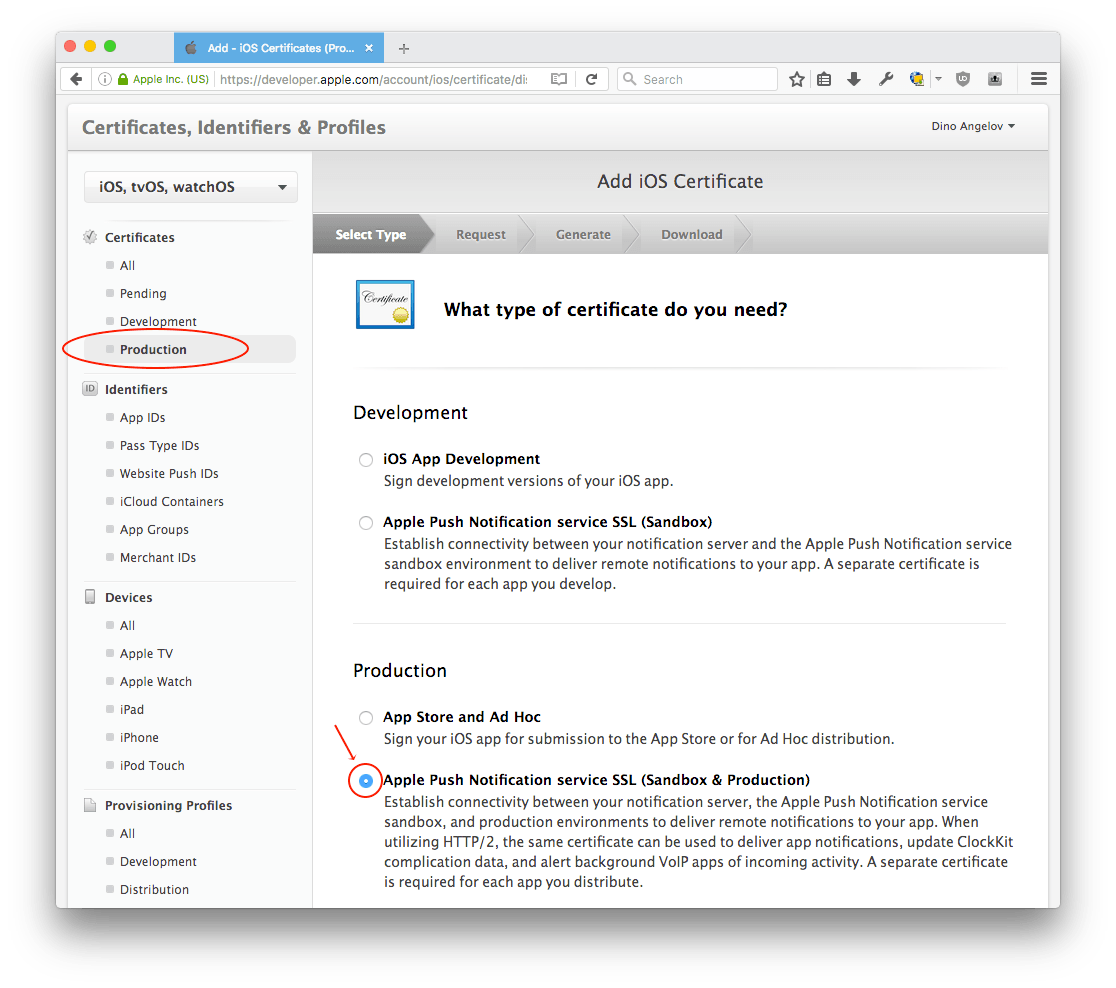
Next, we’ll need to get a new certificate in order to authenticate with Apple’s Push Notification (APN) servers.
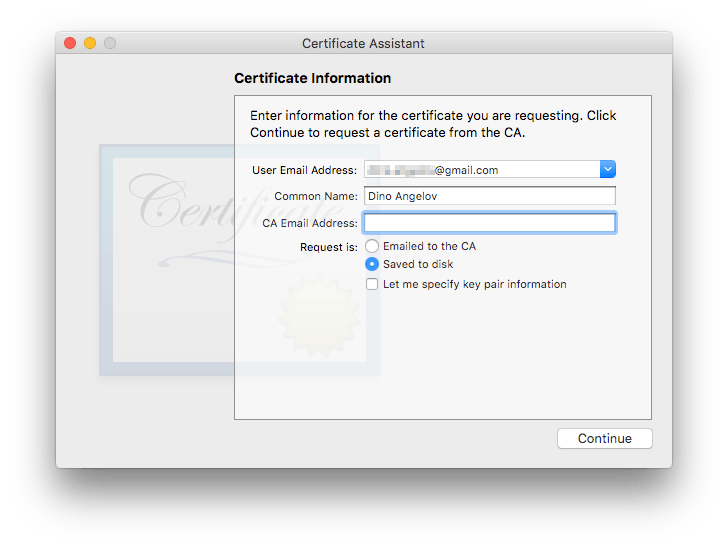
Follow the on-screen instructions and use the certificate assistant to generate your request.
Upload the certificate request to the Member Center and a certificate will be generated for you. Download the newly generated certificate to your computer and double-click it. This will add it to Keychain, from where you will need to export it.
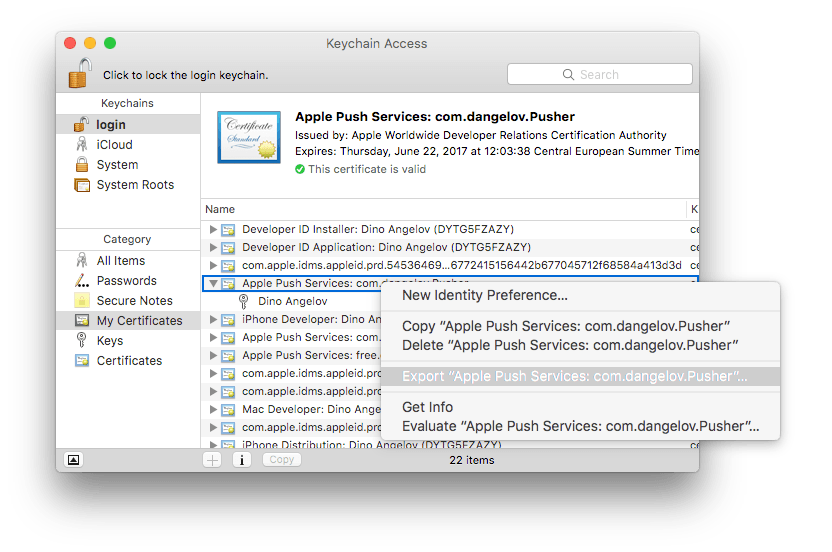
It will ask you for a key when exporting, you can leave it empty. Then, it will prompt you for your Mac password in order to authorize the export.
Once the export finishes, open terminal and cd to where you exported the file (for example: cd ~/Desktop). Then, enter the following into the terminal, replacing PushNotifier with your file name.
openssl pkcs12 -in PushNotifier.p12 -out PushNotifier.pem -nodes -clcerts
Once you’ve finished all this, verify that the “Push Notifications” capability now shows as Enabled under you App ID for Production. Don’t worry if “Sandbox” still shows as “Configurable”, the certificate you created will work for the sandbox as well so you can test before deploying. If you’re adding Push Notifications to an existing app, you will sometimes need to re-create the provisioning profiles too and then re-download & assign them manually or via Xcode.
Everything is now in place to send your first notification! Your best bet is to run the script that sends push notifications through a CLI. If you do it with a web request (for example by clicking an admin panel button), you risk getting time-out issues if you have a sizable list of devices to send to.
Create a new file called composer.json in your PHP project directory on the server. We’ll use Composer to install a dependency.
{
    "require": {
        "sly/notification-pusher": "^2.2"
    }
}
Navigate to your project directory on the server and execute composer install. This will download the dependency and make it easily accessable. Then, we can write our push notification sender code. Save the following file as send.php on your server.
<?php
$db_host = 'localhost';
$db_name = 'taskly';
$db_user = 'taskly';
$db_pass = 'ls9fjb72kc[]-1=cmao';
$loader = include 'vendor/autoload.php';
use Sly\NotificationPusher\PushManager,
Sly\NotificationPusher\Adapter\Apns as ApnsAdapter,
Sly\NotificationPusher\Adapter\Gcm as GcmAdapter,
Sly\NotificationPusher\Collection\DeviceCollection,
Sly\NotificationPusher\Model\Device,
Sly\NotificationPusher\Model\Message,
Sly\NotificationPusher\Model\Push
;
$push_environment = PushManager::ENVIRONMENT_DEV;
if (($argc > 1) && ($argv[1] === 'production')) {
$push_environment = PushManager::ENVIRONMENT_PROD;
}
try {
$pdo = new \PDO(
sprintf('mysql:host=%s;dbname=%s;charset=utf8mb4', $db_host, $db_name),
$db_user,
$db_pass,
[
\PDO::ATTR_ERRMODE => \PDO::ERRMODE_EXCEPTION,
\PDO::ATTR_PERSISTENT => false,
]
);
// Send notifications to all iOS devices.
$statement = $pdo->prepare(
"SELECT `token`
FROM `push_notification_devices`
WHERE `active`=1 AND `type`='ios'"
);
$statement->execute();
$cert_path = 'NotificationPusher.pem';
$apnsAdapter = new ApnsAdapter(
array('certificate' => $cert_path)
);
$devices = new DeviceCollection();
while ($row = $statement->fetch(PDO::FETCH_ASSOC)) {
$devices->add(new Device(bin2hex(base64_decode($row['token']))));
}
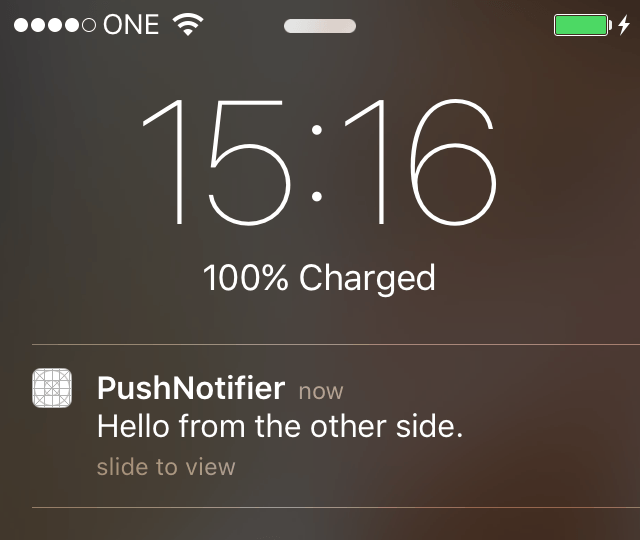
$message = new Message('Hello from the other side.');
$pushManager = new PushManager($push_environment);
$push = new Push($apnsAdapter, $devices, $message);
$pushManager->add($push);
$push_result = $pushManager->push();
/* Exercise for the reader. var_dump() the results and process the expired
device tokens. */
// Send notifications to all Android devices.
$statement = $pdo->prepare(
"SELECT `token`
FROM `push_notification_devices`
WHERE `active`=1 AND `type`='android'"
);
$statement->execute();
$gcmAdapter = new GcmAdapter(
array(
'apiKey' => 'YOUR API KEY GOES HERE',
)
);
$devices = new DeviceCollection();
while ($row = $statement->fetch(PDO::FETCH_ASSOC)) {
$devices->add(new Device(base64_decode($row['token'])));
}
$message = new Message('Hello from the android side.');
$pushManager = new PushManager($push_environment);
$push = new Push($gcmAdapter, $devices, $message);
$pushManager->add($push);
$push_result = $pushManager->push();
} catch(\PDOException $e) {
echo $e->getMessage();
} catch (Exception $e) {
echo $e->getMessage();
}//end try
And then run it.
$ php send.php
If you set everything up correctly, you should’ve received your first notification! Congratulations!
From here, you can easily modify and extend the above to send custom, actionable notifications, play custom sounds, increase the app badge number etc. You can have a look at the iOS documentation to get a bit more info, and of course, have a look at the NotificationPusher documentation. Have fun!
Pssst. Hey. Come check us out at Free-eBooks.net and read something different. Pick from thousands of eBooks from indie authors. Grab our mobile apps and read on the go. It’s fun. :)
Enjoyed reading this? You might also like 1 Year in the App Store – when “Move Fast and Break Things” doesn’t work